Download the Info deck on how to manually upload an asset in a CTV/OLV creative Here
Check this tutorial video on CTV/OLV manual asset upload
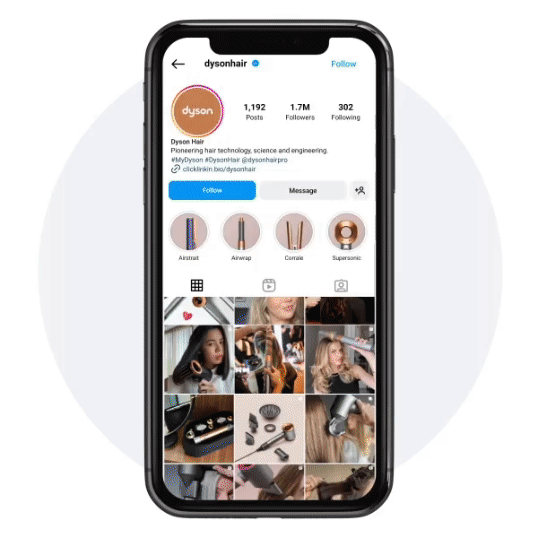
Turn This.. Into This..

This article will explain the procedure to follow when creating a CTV/OLV (VAST) creative in the Nova platform with the Manual Asset option. With this, you can bring any of your own video assets and build them into one of our templates. Manual asset upload works for Facebook, Instagram, YouTube, LinkedIn, Tiktok, X (Formerly Twitter), Snapchat, Pinterest, etc.
Benefits:
- No need to wait on a social posting or launch kick-off
- Can create Social Display ads even if no post exists or is planned, if you have the assets
- Add creative variation by uploading the same assets into different social media templates
Learn more about how to download videos from Social Media posts like Facebook, Instagram, TikTok, and X (formerly Twitter).
You can read more about CTV Tech Specs and FAQs Here
In order to create a VAST Video creative in the Nova platform, you will need the following:
- Video Asset - Either vertical or horizontal
- Brand Logo and Brand Name
- Destination URL
- (Optional) QR Code
- (Optional) Tracker URLs
Procedure
- Once you login into Nova UI, you'll need to create a new campaign. Learn about creating a new campaign here
- Under a campaign, hover over to the Add Creative button
-png-1.png)
- Select either of the option to Add CTV (VAST) Creative or Add OLV (VAST) Creative button.
-png-1.png)
- Add Creative Name in Creative Details. Optional: Select Background Colour and Text Colour if desired.
-png.png)
- Select any of our pre-defined template in the Video Template section. The Template Options section will change based on the chosen layout. Each template will have unique animations and transitions that will add flair to any video creative in just a few clicks.

- The Social card template comes with options to customize your background and QR outline gradients. It also includes a gradient picker with pre-selected gradients to make your end card stand out. You can adjust fonts to match your style. Additionally, you have the ability to place QR codes, adjust the foreground color of the QR code, and choose where to place your brand logo.

- Custom Horizontal shows toggles for Intro Scene and Outro Scene as well as some customization options like Caption Position, QR Code Placement & Brand Logo Placement.

- Custom Vertical includes toggle options for the Intro Scene and Outro Scene, options for on-screen object positions like Caption Position, Media Position & CTA Position. There is also a toggle for the Background Media Blur Effect , Social Network Icon & Caption Background Color.

- The Social card template comes with options to customize your background and QR outline gradients. It also includes a gradient picker with pre-selected gradients to make your end card stand out. You can adjust fonts to match your style. Additionally, you have the ability to place QR codes, adjust the foreground color of the QR code, and choose where to place your brand logo.
- Add the Destination URL in the Landing Page section.

For Best Practices, keep the caption/CTA short so the viewer is able to read them. Also, remove any hashtags from the caption as they don't really fit in the CTV environment.
- Toggling the QR Code/CTA Button on; allows a separate QR Code/CTA Button Destination URL to be added. Customization options exist. The QR Code and CTA Button colour can only be edited when the video template is Vertical Video.
The QR Code is only available for CTV creatives and the CTA Button is only available for OLV creatives.
QR Code-png.png)
CTA button
The Landing Page can also be set to a Telephone Number or an Email Address. Read more here
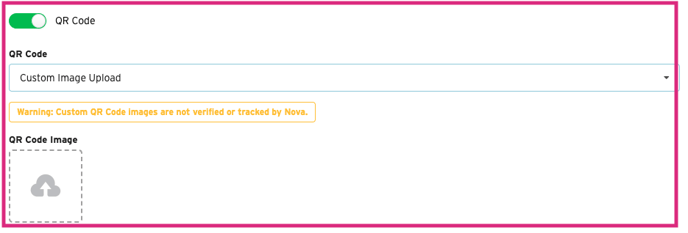
Customized QR Codes for CTV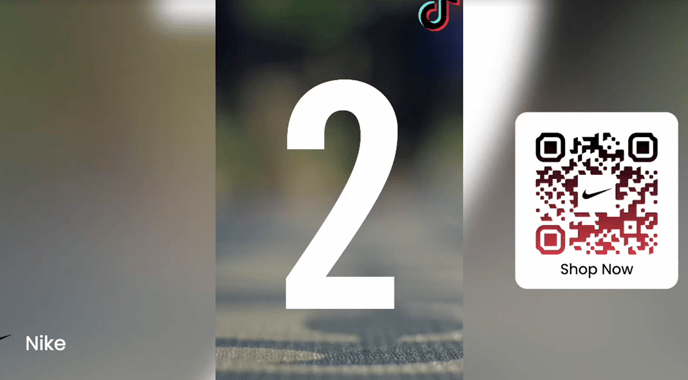
- To customize QR codes under any CTV creative, navigate to the QR Code section of the creative.
- The default is “standard”, click the dropdown box and select Custom Image Upload
- Drag and drop the custom QR code onto the QR Code Image upload (or just click it and select the image to upload)
- There are no specific minimum height/width requirements; standard QR codes should suffice.
- Support (PNG/JPG) image formats.
- Tracking is not enabled on customized QR code uploads.
- (Required) Upload Brand Logo and input Brand Name. Customization can be made to the font and the logo can be rounded.
-png.png)
- Add a Caption. You've the option to customize the font
-png.png)
- In Media, upload a video. If desired, the video can be directly trimmed in-browser and also muted.
-png.png)
- (Optional) Trackers can also be added.
-png.png)
- View the Preview section to see how the video will look, in real-time.
-png.png)
- Hit the Save button to save the creative.
-png.png)
- Click on Render button to generate the VAST tag. This may take up to 30 minutes.
-png.png)
-
If rendering is not yet complete, you will see a warning message. Wait a few more minutes and try again.
-png.png)
- Select Review Render to Approve or Reject the creative.
-png.png)
-
Clicking Approve will lock the creative and it can no longer be edited. It will then allow you to export your VAST Tag.
-png.png)
Once you Approve the rendered creative, you will no longer be allowed to change it. If you need to make changes to an approved creative, Duplicate the creative, make your changes, then Render the duplicated creative.
18. If you’re not satisfied, Reject the creative and resubmit another render once you’ve made changes. Rejecting the render returns the creative to the editing stage .
-png.png)
Learn about Trafficking the VAST Tags in your Ad Server/DSP here
If you've any further questions or facing any difficulty in creating a CTV/OLV creative via manual asset upload, send us your request to support@createwithnova.com